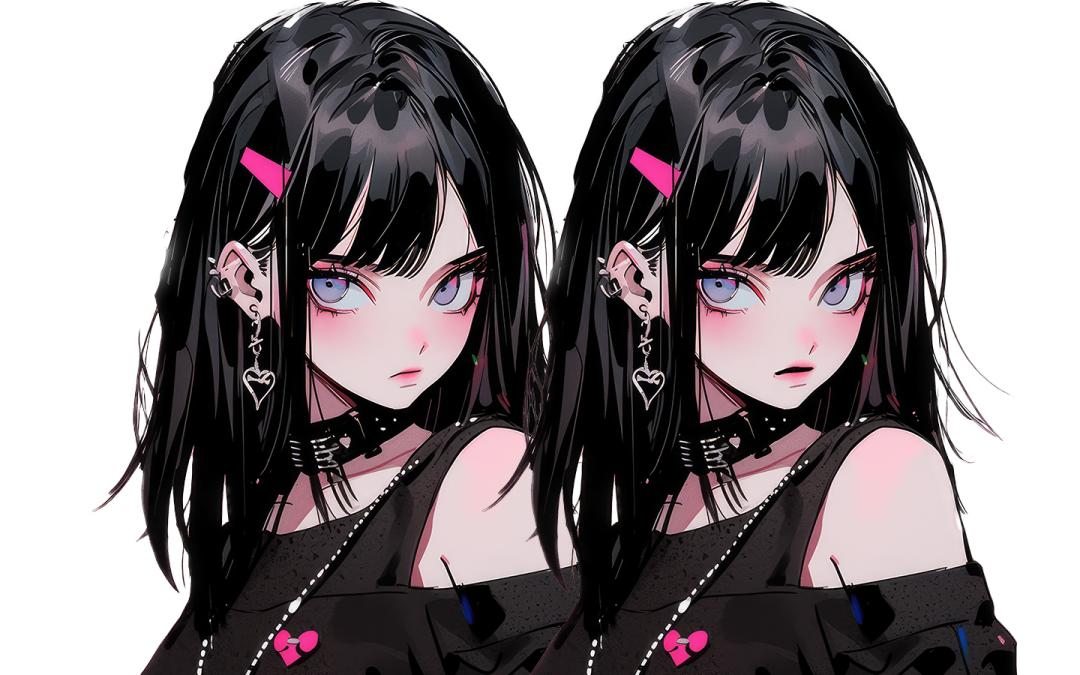
We created a bunch of Midjourney images and used them in a 348 page illustrated book (and an 88 page graphic novel). We were about to publish it when someone politely noted that while the book was very good, none of our characters had their mouths open when they talked. So we did a ChatGPT search and got clear instructions on how to get our characters mouths open. This video gives you the step-by-step how to.
We got clear advice from Chat GPT, and we added some elements:
Selection:
First, use the Lasso Tool or Pen Tool to carefully select the mouth area of the character. This is a crucial step as a precise selection will lead to a more realistic result.
Layer Duplication:
Once you have the mouth area selected, copy it onto a new layer. You can do this by pressing Ctrl+J (Cmd+J on Mac).
NOTE FROM DUCKBYTE: MAKE BOTTOM LAYER INVISIBLE. USE MAGIC WAND TO SELECT OUTSIDE MOUTH THEN SELECT INVERSE
Transformation:
Select the new layer with the mouth. [AS WE DESCRIBED ABOVE] Then, use the Transform tool (Ctrl+T or Cmd+T) to slightly enlarge or reposition the mouth. This simulates the mouth opening. Be cautious with the amount of transformation to keep it looking natural.
Warp tool:
For more detailed adjustments, use the Warp tool within the Transform options. This allows for more nuanced shaping of the mouth, such as creating the curve of an open mouth.
Last step that we needed:
COLOR IN BLACK OPENING TO MOUTH WITH PROPERLY SIZED BRUSH TOOL.
MAKE BOTTOM LAYER VISIBLE TO ASSESS RESULTS.
SMILE
NOTE: As mentioned in the video, we benefited significantly from a tool called Gigapixel AI, (by Topaz Labs) which has the delicious quality (for any long-term image manipulator) of allowing you to upsize images, adding MORE detail than is in the original. We GP’d our image before starting this process. We have used that tool dozens of times. It is a completely reliable workhorse for us, and worth every single penny.
—
More advice from Chat GPT that we didn’t seem to need:
5. Clone Stamp and Healing Brush Tools**: To blend the edges and ensure the opened mouth looks natural, use the Clone Stamp and Healing Brush Tools. These tools help in fixing any mismatch in textures or colors around the mouth area.
6. **Additional Details**: If needed, add details like teeth or tongue using the Brush tool for realism. This step depends on how open the mouth is and the angle of the character.
7. **Shadows and Highlights**: Add shadows and highlights to give depth to the mouth. This can be done using the Burn and Dodge tools, respectively. Proper shading will enhance the 3D appearance of the mouth.
8. **Layer Blending**: Finally, blend the edited mouth layer with the original image. Adjust the layer’s opacity or use layer masks for a seamless blend.
Remember, subtlety is key. Overdoing the transformation can lead to an unnatural look. Additionally, each image is unique, so these steps might need slight adjustments based on the specific character and photo.
If you’re new to Photoshop or need more visual guidance, it might be helpful to look up video tutorials that demonstrate these steps.